If you read my previous blog, then you know that I set yearly goals for myself that start and end on my birthday. Since I'm now 27 (happy birthday to me!), my new list will be 27 goals to accomplish before I'm 28. I'm putting a foodie spin on the goals this year and all of my goals need to be cooking or food related.
Goals:
1. Use eggplant in a meal. Ever since a horrible experience in college I've been afraid of eggplant. This year I'm going to embrace that weird purple vegetable and make something awesome with it.
2. Bake another pie. I made my first pie ever last year; this year I will make another one!
3. Take another cooking class.
4. One week a month I'll cook only vegetarian meals (ovo/lacto ingredients are acceptable).
5. I will have at least 3 new blog posts a week for the whole year (except when we're on vacation).
6. Host a dinner party for friends. Maybe a themed movie night party?
7. Try a new (to us) restaurant every month.
8. Bake a souffle.
9. Buy more potted herbs for the house.
10. Make Tiramisu completely from scratch
11. Cook a meal with fish at least twice a month.
12. Get an icecream maker and use it! (Halfway done with this goal as I received an icecream maker on Saturday for my birthday!)
13. Make at least one pasta dish from scratch (including the noodles!)
14. Try making my own ricotta and mozzarella cheese.
15. Get a freezer for the garage.
16. Buy an aebelskiver pan and use it!
17. Cook my very first turkey
18. Look into buying a juicer and use it to add more fruits/veggies to our diet
19. Make caramels
20. Make Thai food at home (probably curry and Phad Thai)
21. Make macarons
22. Try making creme fraiche (it's supposed to be ridiculously easy)
23.Sign on with a home delivery service for local organic produce
24. Make homemade jam (I'm thinking blueberry)
25. Make creme brulee (guess I need to buy a torch!)
26. Learn how to use my camera to take better pictures of my meals
27. Try more recipes from my Irish and Norwegian heritage.
Here's to me accomplishing all of these goals before I turn 28!
Monday, February 28, 2011
Friday, February 25, 2011
Comfort Food: (Vegan) Bread Pudding
I've always loved bread pudding, but had never made it myself. That all changed on Super Bowl Sunday when I decided I just had to try it (I know it doesn't seem like a good football-day fit, but it sounded good so I didn't care). I found this interesting vegan version of it, and it sounded like it would be delicious!
Pumpkin-Chocolate Chip Bread Pudding
Ingredients:
Directions:
Pumpkin-Chocolate Chip Bread Pudding
Ingredients:

1 cup coconut milk
1 15-ounce can organic pumpkin
1/2 cup brown sugar (can use maple syrup)
1/2 teaspoon salt
1 1/2 teaspoons cinnamon
1 1/2 teaspoons nutmeg
1/2 teaspoon ginger
1/2 teaspoon cloves
10 cups cubed day-old bread of your choice
3/4 cup semisweet chocolate chips (Guittard and Ghirardelli are among those that are nondairy)
2 tablespoons brown sugar
Powdered sugar for dusting (optional)
Directions:
1. Preheat oven to 350 degrees. Grease a 9-by-13-by-2-inch baking dish.
2. Mix the coconut milk, pumpkin, brown sugar, salt and spices until smooth. In a large bowl, toss the bread cubes with the pumpkin mixture and chocolate chips until each bread cube is coated.
3. Fill the baking dish with the mixture and lightly press it down with the back of a spoon. Evenly sprinkle about 2 tablespoons brown sugar over the top of the bread pudding. The brown sugar will help the pudding to caramelize on the edges. (Steps 1 through 3 can be done up to three days in advance; store covered in the refrigerator.)
4. Bake for 25 to 30 minutes, until top is lightly browned. Let the pudding cool a few minutes before serving. Cut into portions, then garnish with powdered sugar if desired and serve warm. The pudding can be baked right before serving or earlier that day and then reheated for 8 to 10 more minutes right before serving.
Wednesday, February 23, 2011
Julia Child was definitely a genius
I had Monday off, so I wanted to make an EPIC meal for dinner that night. I settled on a traditional Julia Child recipe: Boeuf Bourguignon! I've wanted to try making this meal ever since I watched Julie & Julia (no alarm was needed for my version of this meal - I can't imagine burning it and having to make it all over again, way too much work)!
I started my recipe prep around 12:15pm, and I didn't leave the kitchen until almost 2. There are A LOT of steps in this recipe, and it is very time consuming. I was going to leave out the mushrooms (we really don't enjoy cooked mushrooms in this house), but I figured if I was going to follow the recipe closely then I needed to do all the steps and experience it the way Julia Child intended!
There are a lot of steps in this recipe, but don't be alarmed - a lot of them are super easy.
Boeuf Bourguignon (aka Beef Burgundy)
Ingredients:


 Notes:
· Don't skip drying the beef - that's super important to get it to brown. Also, don't crowd the pan while browning the meat. This takes the longest because you can only do 5ish pieces of meat at a time, but if you crowd the pan the meat won't brown.
· I had to turn my oven down to 200 degrees for the 3-4 hour cooking time; you want the mixture to be just barely bubbling. It needs to be a very, very slow simmer.
· I did have to boil the sauce down for about 15 minutes. Take your time, you don't want to rush this last step!
Enjoy!! Savor this meal, because it sure took long enough to make!
I started my recipe prep around 12:15pm, and I didn't leave the kitchen until almost 2. There are A LOT of steps in this recipe, and it is very time consuming. I was going to leave out the mushrooms (we really don't enjoy cooked mushrooms in this house), but I figured if I was going to follow the recipe closely then I needed to do all the steps and experience it the way Julia Child intended!
There are a lot of steps in this recipe, but don't be alarmed - a lot of them are super easy.
Boeuf Bourguignon (aka Beef Burgundy)
Ingredients:

- 6 ounces bacon, solid chunk
- 1 tablespoon olive oil
- 3 lbs lean stewing beef, cut into 2-inch cubes
- 1 carrot, peeled and sliced
- 1 onion, peeled and sliced
- 1 teaspoon salt
- 1/4 teaspoon pepper, freshly ground
- 2 tablespoons flour
- 3 cups red wine (I used Chianti but you could use Bordeaux or Burgundy)
- 2 -3 cups beef stock
- 1 tablespoon tomato paste
- 2 garlic cloves, mashed (you may choose to add more)
- 1 sprig thyme (or 1/2 teaspoon dried thyme)
- 1 bay leaf, preferably fresh
- 18 -24 white pearl onions, peeled
- 1 1/2 tablespoons unsalted butter
- 1 1/2 tablespoons olive oil
- 1/2 cup beef stock
- salt & fresh ground pepper
- 1 bay leaf
- 1 sprig thyme
- 2 sprigs parsley
- 1 lb mushroom, quartered
- 2 tablespoons unsalted butter
- 1 tablespoon olive oil
· First prepare the bacon: cut off the rind and reserve.
· Cut the bacon into lardons about 1/4" thick and 1 1/2" long.
· Simmer the rind and the lardons for ten minutes in 1 1/2 quarts of water.

· Drain and dry the lardons and rind and reserve.
· Pre-heat the oven to 450°F.
· Put the tablespoon of olive oil in a large (9" - 10" wide, 3" deep) fireproof casserole and warm over moderate heat.
· Saute the lardons for 2 to 3 minutes to brown lightly.

· Remove to a side dish with a slotted spoon.
· Dry off the pieces of beef and saute them, a few at a time in the hot oil/bacon fat until nicely browned on all sides.


· Once browned, remove to the side plate with the bacon.

· In the same oil/fat, saute the onion and the carrot until softened.

· Pour off the fat and return the lardons and the beef to the casserole with the carrots and onion.

· Toss the contents of the casserole with the salt and pepper and sprinkle with the flour.

· Set the uncovered casserole in the oven for four minutes.
· Toss the contents of the casserole again and return to the hot oven for 4 more minutes.
· Now, lower the heat to 325°F and remove the casserole from the oven.
· Add the wine and enough stock so that the meat is barely covered.

· Add the tomato paste, garlic and herbs and the bacon rind.
· Bring to a simmer on the top of the stove.
· Cover and place in the oven, adjusting the heat so that the liquid simmers very slowly for three to four hours.
· The meat is done when a fork pierces it easily.
· While the meat is cooking, prepare the onions and mushrooms and set them aside till needed.
· For the onion, if using frozen, make sure they are defrosted and drained.
· Heat the butter and oil in a large skillet and add the onions to the skillet.

· Saute over medium heat for about ten minutes, rolling the onions about so they brown as evenly as possible, without breaking apart.
· Pour in the stock, season to taste, add the herbs, and cover.

· Simmer over low heat for about 40 to 50 minutes until the onions are perfectly tender but retain their shape and the liquid has mostly evaporated.
· Remove the herbs and set the onions aside.
· For the mushrooms, heat the butter and oil over high heat in a large skillet.
· As soon as the foam begins to subside add the mushrooms and toss and shake the pan for about five minutes.
· As soon as they have browned lightly, remove from heat.
To Finish the Stew:.
· When the meat is tender, remove the casserole from the oven and empty its contents into a sieve set over a saucepan.
· Wash out the casserole and return the beef and bacon to it (discarding the bits of carrot and onion and herbs which remain in the sieve).
· Distribute the mushrooms and onions over the meat.
· Skim the fat off the sauce and simmer it for a minute or two, skimming off any additional fat which rises to the surface.
· You should be left with about 2 1/2 cups of sauce thick enough to coat a spoon lightly. If the sauce is too thick, add a few tablespoons of stock. If the sauce is too thin, boil it down to reduce to the right consistency.
· Taste for seasoning.
· Pour the sauce over the meat and vegetables.
· If you are serving immediately, place the covered casserole over medium low heat and simmer 2 to 3 minutes.
· Serve in the casserole or on a warm platter surrounded by noodles, potatoes or rice and garnished with fresh parsley.
· If serving later or the next day, allow the casserole to cool and place cold, covered casserole in the refrigerator.
· 20 minutes prior to serving, place over medium low heat and simmer very slowly for ten minutes, occasionally basting the meat and vegetables with the sauce.
 Notes:
· Don't skip drying the beef - that's super important to get it to brown. Also, don't crowd the pan while browning the meat. This takes the longest because you can only do 5ish pieces of meat at a time, but if you crowd the pan the meat won't brown.
· I had to turn my oven down to 200 degrees for the 3-4 hour cooking time; you want the mixture to be just barely bubbling. It needs to be a very, very slow simmer.
· I did have to boil the sauce down for about 15 minutes. Take your time, you don't want to rush this last step!
Enjoy!! Savor this meal, because it sure took long enough to make!
Tuesday, February 22, 2011
Bok Choy Awesomeness
This is a ridiculously easy recipe, and it has bacon, which is always nice. :) I've often said I will never be able to be a full vegetarian because I like bacon too much! The other thing I love about this recipe is the bok choy. It truly is one of my favorite vegetables. I always serve this recipe over rice to make a complete meal.
Bacony Bok Choy
Ingredients:
Directions:
Fry bacon in a large skillet until crispy. Remove bacon and drain the fat, reserving one tablespoon of the grease in the skillet. Add the olive oil, onion, red pepper flakes and garlic. Cook and stir over medium heat until the onions are starting to be tender.
 Add the bok choy, and place a lid on the pan.
  Let cook for 3 to 5 minutes. Remove the lid; cook and stir until the bok choy is tender but still crunchy, about 2 minutes. Stir in the bacon, and serve mixture over rice.
Bacony Bok Choy
Ingredients:

4 slices bacon, chopped
2 pounds baby bok choy
1 teaspoon olive oil
1/2 small red onion, chopped
1 teaspoon red pepper flakes1 teaspoon minced garlic
Directions:
Fry bacon in a large skillet until crispy. Remove bacon and drain the fat, reserving one tablespoon of the grease in the skillet. Add the olive oil, onion, red pepper flakes and garlic. Cook and stir over medium heat until the onions are starting to be tender.
 Add the bok choy, and place a lid on the pan.
  Let cook for 3 to 5 minutes. Remove the lid; cook and stir until the bok choy is tender but still crunchy, about 2 minutes. Stir in the bacon, and serve mixture over rice.
Monday, February 21, 2011
Another dud: Manzana Chili Verde
I tried another recipe from Veganomicon, and again it was a dud. I'm getting frustrated and starting to wonder if I'm screwing up the recipes, or if they're just not very good to start with. So many people love this cookbook...I just don't understand.
I'm not going to bother with posting the ingredients and directions to this one, since I didn't care for it. We didn't even keep the leftovers. If you want to try it you can find all of the instructions here.
Here are a couple pictures from this recipe.

 The one fun thing about the recipe is you get to use an immersion blender (if you have one).
I'm not going to bother with posting the ingredients and directions to this one, since I didn't care for it. We didn't even keep the leftovers. If you want to try it you can find all of the instructions here.
Here are a couple pictures from this recipe.


 The one fun thing about the recipe is you get to use an immersion blender (if you have one).
Friday, February 18, 2011
Yummy winter crockpot dish
I am seriously in love with my crockpot. I know I've said that before, but it really is wonderful to come home to dinner just waiting to be eaten. I tried a new vegetarian recipe, and it really was pretty good!
Pumpkin, Chickpea, and Red Lentil Stew
from Better Homes and Gardens
Ingredients:
In the crockpot combine butternut squash, chickpeas, carrots, onion, lentils, tomato paste, ginger, lime juice, spices, and broth.
Cook on low for 8 hours. Top each serving with cilantro and peanuts, and serve over rice.

Enjoy!
Pumpkin, Chickpea, and Red Lentil Stew
from Better Homes and Gardens
Ingredients:

- 1 pound butternut squash, peeled, seeded, and cut into 1-inch cubes
- 1 15-ounce can chickpeas (garbanzo beans), rinsed and drained
- 3 medium carrots, sliced 1/2 inch thick
- 1 cup chopped onion (1 large)
- 1 cup red lentils, rinsed and drained
- 2 tablespoons tomato paste
- 1 tablespoon grated fresh ginger
- 1 tablespoon lime juice
- 1 teaspoon ground cumin
- 1/4 teaspoon ground turmeric
- 1/4 teaspoon ground black pepper
- 4 cups chicken or vegetable broth
- 1/4 cup chopped peanuts
- 2 tablespoons chopped fresh cilantro
- Plain nonfat yogurt (optional)
In the crockpot combine butternut squash, chickpeas, carrots, onion, lentils, tomato paste, ginger, lime juice, spices, and broth.
Cook on low for 8 hours. Top each serving with cilantro and peanuts, and serve over rice.

Enjoy!
Wednesday, February 16, 2011
Black Bean and Veggie Enchiladas
I found this recipe on a fellow blogger's site, and decided it sounded pretty good. I liked this recipe, but didn't love it. Also, the recipe calls for 28oz of enchilada sauce which is way too much. I would cut that amount in half, as my enchiladas were literally swimming in the sauce; I had to drain some of it off before we could eat the enchiladas.
Bean and Veggie Enchiladas
courtesy of Swanky Dietitian
Ingredients: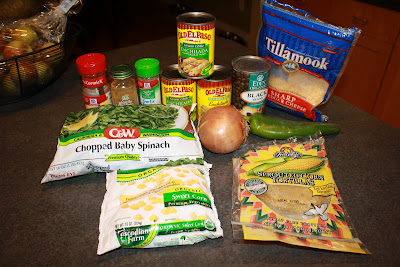
1) Saute the onions and pepper in olive oil.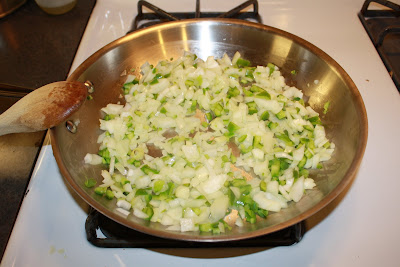 2) In a bowl, mix the spices, beans, corn, spinach, onions and pepper.
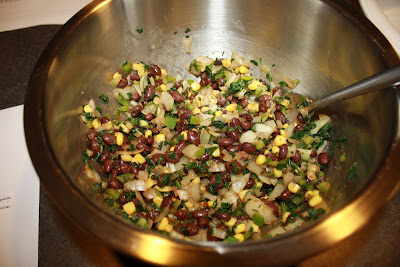 3) Put about 2/3 cup of the mixture in the center of a tortilla and roll up, then place in the baking dish.
4) After rolling all of the tortillas, cover with the enchilada sauce, and bake at 350 degrees for 10 minutes.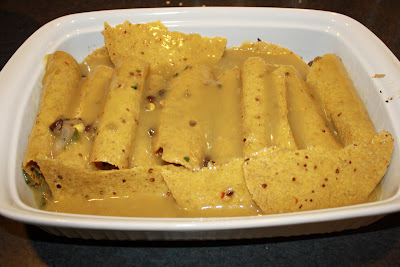 5) Cover the enchiladas with cheese and bake for an additional 10 minutes.
Bean and Veggie Enchiladas
courtesy of Swanky Dietitian
Ingredients:

- 12-14 6" Corn Tortillas
- 1 can Black Beans, drained and rinsed
- 3/4 cup frozen Roasted Corn, defrosted
- 1 cup frozen Spinach, defrosted and drained
- 1 Onion, diced
- 1 Anaheim Pepper, diced
- 1 tsp Cumin
- 1 tsp Chili Powder
- 1/2 tsp Garlic Salt
- 1 large can of your favorite Green Enchilada Sauce (28oz)
- 2 cups of Grated Cheese
1) Saute the onions and pepper in olive oil.
 2) In a bowl, mix the spices, beans, corn, spinach, onions and pepper.
 3) Put about 2/3 cup of the mixture in the center of a tortilla and roll up, then place in the baking dish.
4) After rolling all of the tortillas, cover with the enchilada sauce, and bake at 350 degrees for 10 minutes.
 5) Cover the enchiladas with cheese and bake for an additional 10 minutes.
Tuesday, February 15, 2011
Spicy Ziti
Another delicious recipe from Quick-Fix Vegetarian. I really love this cookbook, the recipes are fast and almost everything has been super-tasty!
Spicy Ziti with Olives and Capers
view the entire cookbook here
Ingredients: 2 tbsp olive oil
3 cloves garlic, minced
1/2 tsp red pepper flakes
28oz can diced tomatoes
3/4 cup Kalamata olives, halved
1 tbsp capers, rinsed
3 tbsp fresh chopped parsley
Ground pepper
1 lb ziti
*I added peas with the pasta for some extra veggies*
Directions:
1) Boil the pasta (and peas) in water, drain and set aside.
2) Heat the oil over medium heat in skillet; add garlic and red pepper flakes and stir for 30 seconds. Add the tomatoes and simmer for 10 minutes. Stir in the olives, capers, parsley and pepper. 3) Toss the pasta with sauce and serve.
Spicy Ziti with Olives and Capers
view the entire cookbook here
Ingredients:
 2 tbsp olive oil
3 cloves garlic, minced
1/2 tsp red pepper flakes
28oz can diced tomatoes
3/4 cup Kalamata olives, halved
1 tbsp capers, rinsed
3 tbsp fresh chopped parsley
Ground pepper
1 lb ziti
*I added peas with the pasta for some extra veggies*
Directions:
1) Boil the pasta (and peas) in water, drain and set aside.
2) Heat the oil over medium heat in skillet; add garlic and red pepper flakes and stir for 30 seconds. Add the tomatoes and simmer for 10 minutes. Stir in the olives, capers, parsley and pepper.
 3) Toss the pasta with sauce and serve.
Monday, February 14, 2011
Nutella Cinnamon Rolls = Glorious!!
 Nutella is so very yummy, it makes just about everything better. I found this recipe on Bell'alimento, and I knew that I had to make this recipe immediately. Seriously, what's not to love? You've got Nutella, cherries, and cinnamon rolls, all combined into one amazing recipe. Try it. You'll love it, I guarantee!
Nutella filled Cinnamon Rolls with Cherry Glaze
via Bell'alimento.com
Ingredients:
6.5 tablespoons sugar
1 teaspoon salt
5.5 tablespoons unsalted butter – room temperature
1 large egg – slightly beaten
1 teaspoon lemon zest
3.5 cups all purpose flour
2 teaspoons instant yeast
1 1/8 cups whole milk – room temperature
olive oil – to drizzle mixing bowl
1/4 cup Nutella – {placed into microwave for approximately 15 seconds to soften prior to use}
1/2 cup cinnamon sugar {mix 6.5 tablespoons sugar with 1.5 tablespoons ground cinnamon}
1 cup Powdered Sugar
Cherry Juice
Directions:
1. Cream sugar, salt and butter using your stand mixer with a paddle attachment. Add in egg and lemon zest, mix until smooth. Add flour, yeast and milk. Mix on low speed until dough forms into a ball.

2. Switch to your dough hook, increase speed to medium and knead for approximately 10 minutes or until the dough is silky, supple and tacky {NOT sticky}. NOTE: you might have to adjust by adding flour, or milk to achieve this. Dough should register 77-81 degrees fahrenheit.
3. Remove dough from mixing bowl. Drizzle olive oil into bowl and return dough, rolling it around to coat. Cover with plastic wrap and allow to rest for approximately 2 hours or until dough doubles in size.
4. Mist your counter with cooking spray and transfer dough to counter. Using a rolling pin, {dusting with flour if necessary} roll the dough into a rectangle about 2/3″ thick and 14″ wide. You do NOT want to roll the dough any thinner or buns will be tough.
5. Carefully spread Nutella onto dough with silicone spatula. Leaving approximately 1″ away from edges. Sprinkle cinnamon sugar on top.
6. As tightly as possible roll your dough into a cigar shaped log. Place the seam side down.  Cut the dough into 12 even pieces {approximately 1 3/4″ thick}. Place cut buns onto a baking sheet lined with a silpat or parchment paper approximately 1/2″ apart. Allow to rest at room temperature for approximately 90 minutes OR until pieces have grown into one another/doubled in size.
7. Preheat oven to 350 degrees. Place buns on middle rack and bake for approximately 20-30 minutes or until golden brown. Allow buns to cool for approximately 10 minutes after baking.
8. WHILE buns are baking, make glaze. Into a small bowl, add 1 cup powdered sugar and 2 tablespoons warm milk, 1-2 tablespoon marashino cherry juice. Whisk to combine. Adjust to your level of sweetness/thickness by adding more powdered sugar or cherry juice.
9. Drizzle cinnamon rolls with cherry glaze. Serve immediately, and enjoy!
Subscribe to:
Posts (Atom)